Menu
Apple Music Converter
How to play your own music on Apple Music?
Apple Music has a wide range of songs available. However, some songs or entire albums in your local collection may not be available on the service. For example, there might be demos, live recordings, or rare recordings from indie bands that aren’t available to stream on the service. Maybe you have your own home recordings that you want to have available through the service. What if the songs you loved the most aren't available on Apple Music? Thankfully, the process of importing your own music into the Apple Music library is easy, and works both from the iTunes desktop client, and any music you have stored or recorded on your mobile iOS device.
How to Add Your Own Music to Apple Music on Windows?
If you’re a Windows user, you can use the iTunes app to add your own music files to your Apple Music collection. With an Apple Music subscription, you can store up to 100,000 music files without using your iCloud storage capacity.
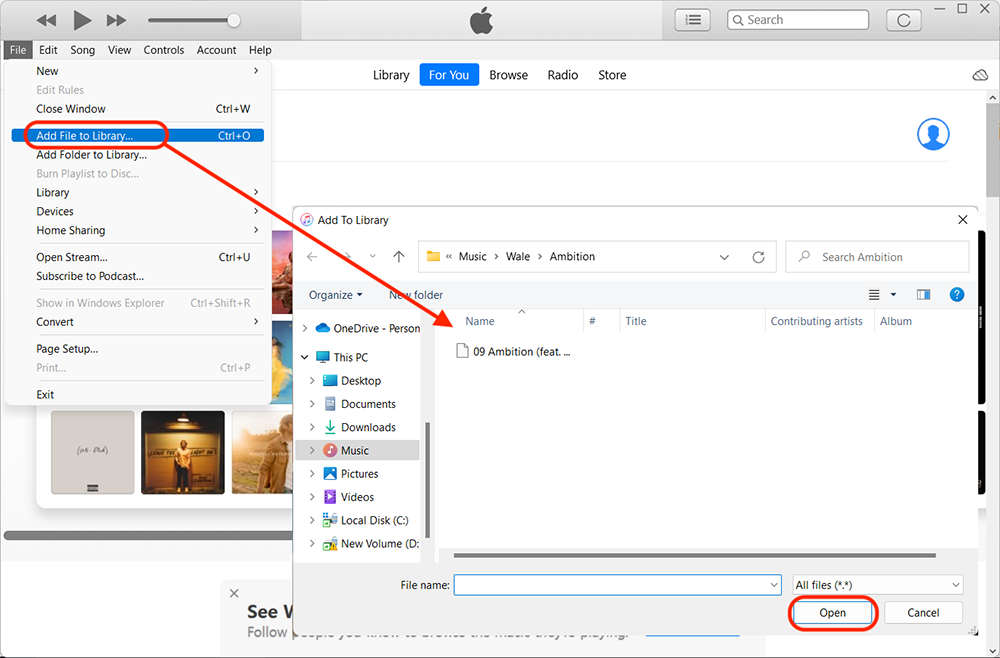
1. Download and install iTunes. Launch iTunes and choose File > Add File to Library or Add Folder to Library.
2. Locate a file or folder, then click Open. If you add a folder, all the files it contains are added to your library.
3. Click File > Library > Update iCloud Music Library. Your music will sync and be available among other devices with iTunes or Apple Music – including the Apple Music website.
How to Add Your Own Music to Apple Music on Mac?
Mac users (running macOS Catalina and later) can use the Music app to add their own music files to Apple Music. You’ll have the ability to store up to 100,000 songs to your cloud collection without using your iCloud storage.
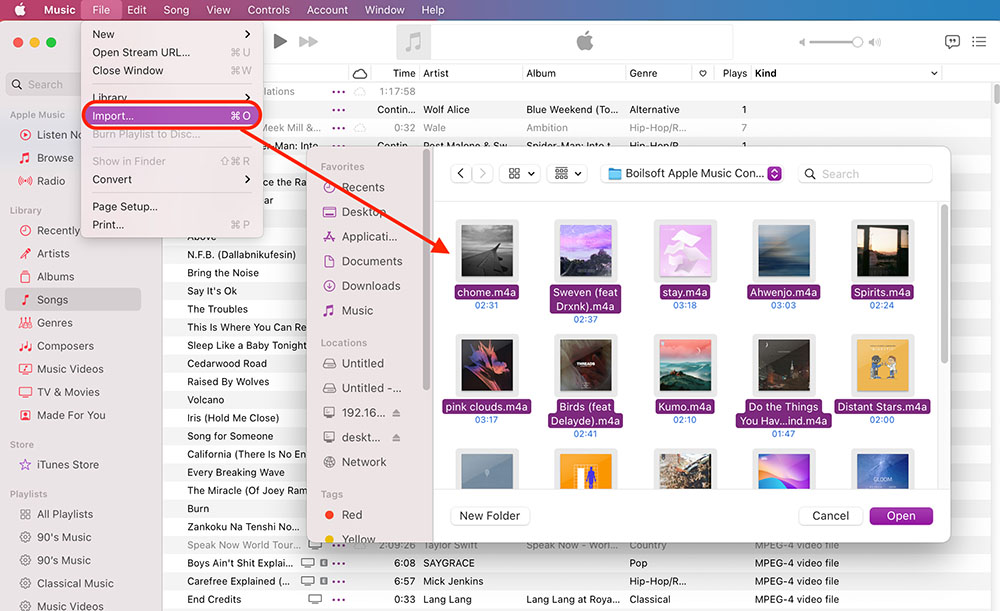
1. In the Music app on your Mac, choose File > Add To Library or File > Import.
If you selected “Copy files to Music Media folder when adding to library” in Files preferences, you see File > Import.
2. Locate a file or folder, then click Open. If you add a folder, all the files it contains are added to your library.
3. Click File > Update Cloud Library to add the files to your Apple Music cloud collection. Then you can access your own music on any apple device.
How to Play Your Own Music and Apple Music Everywhere?
You can save music from Apple Music to iCloud Music Library and share them to your other equipments authorized by Apple ID account. However, Apple Music tracks are protected. Apple prevents the subscribers from copying and sharing their Apple Music tracks freely in order to protect the copyright of the music. Therefore, if you need to play Apple Music everywhere, the key point is finding a solution to remove the DRM protection and convert Apple Music songs to common formats.
As there are so many similar Apple Music tools in the market, we are introducing Ondesoft Apple Music Converter. Ondesoft Apple Music Converter is a professional and powerful Apple Music Converter to convert Apple Music to MP3, M4A, AAC, FLAC, WAV, AIFF, or ALAC at 10X faster speed, and after converting, the ID3 tags will also be saved. Then you can play songs from Apple Music and your own collection together everywhere. For more information on how to use Ondesoft Apple Music Converter to remove the DRM from Apple Music, we will describe it in detail in the following steps.
Step 1. Log in to Your Apple Music account
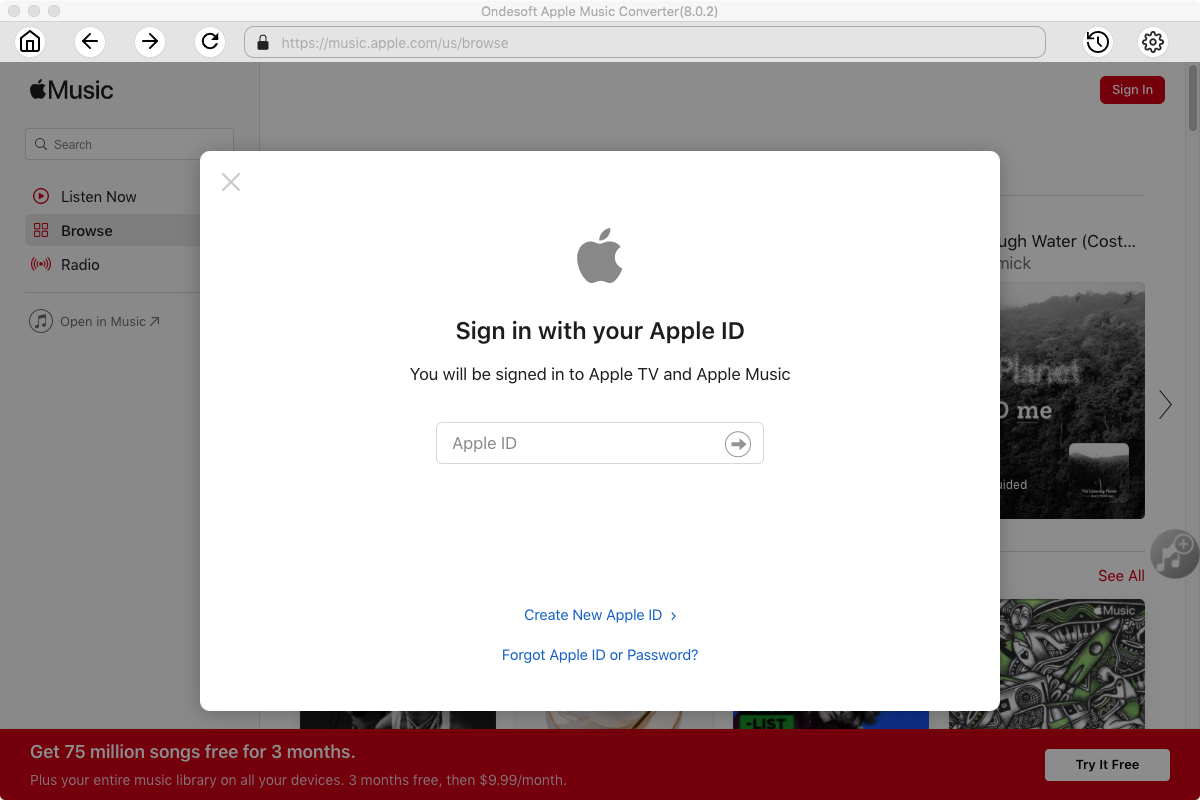
Download, install and run Ondesoft Apple Music Converter version on your Mac or Windows. Click the Sign In button on the top-right corner. Simply follow the on-screen prompts to finish entering the data connected to your Apple Music.
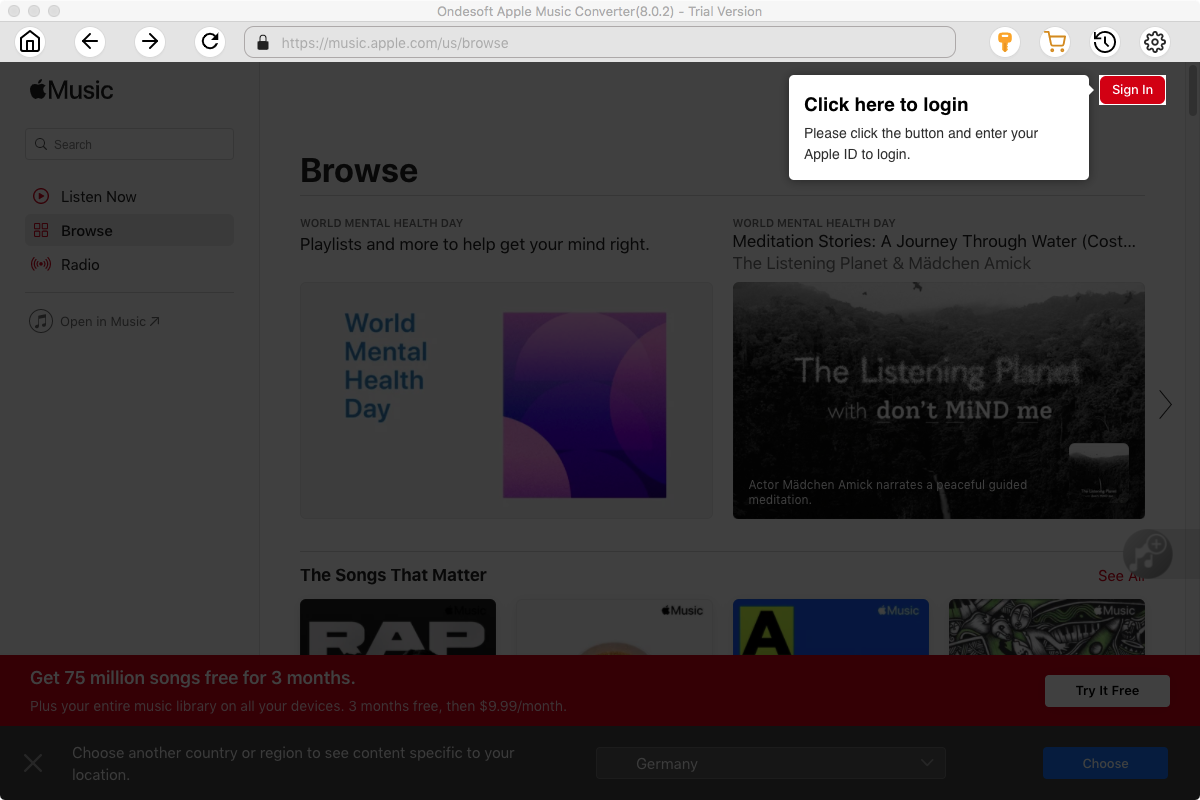
Click the Sign in button and enter your Apple ID.
Step 2. Set the Output Parameters
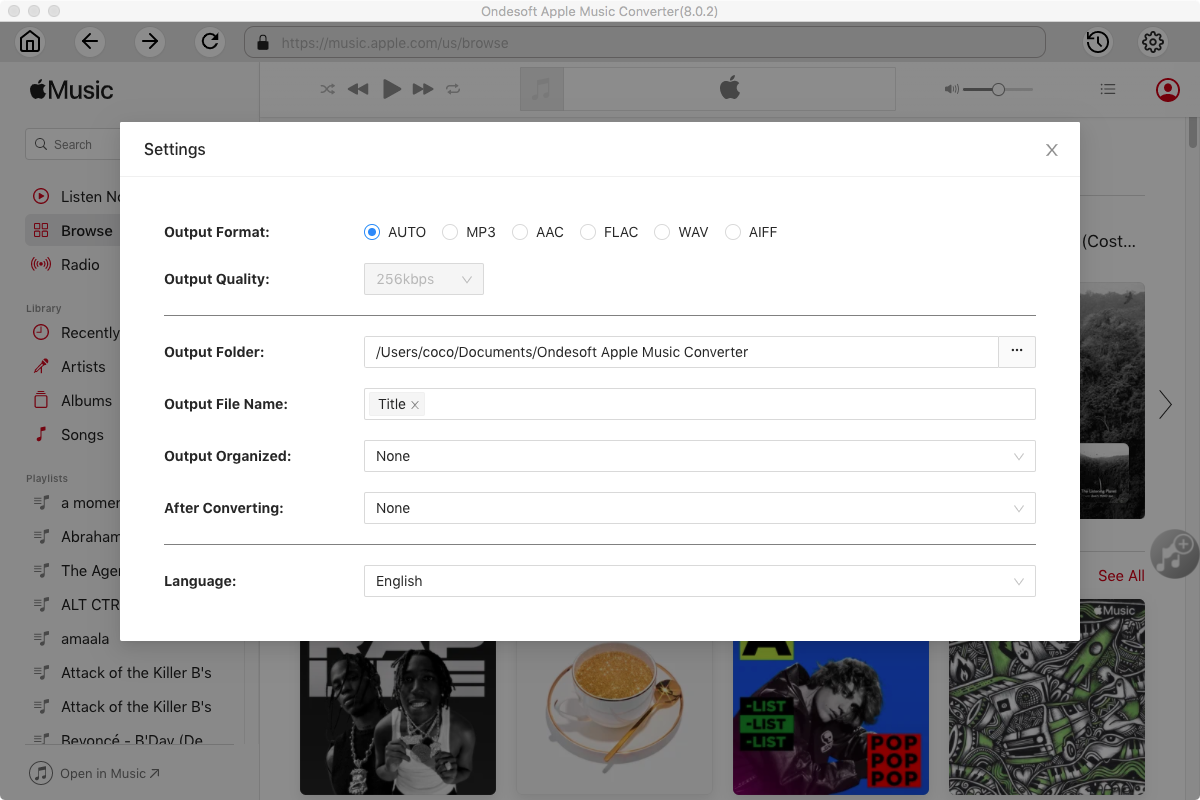
Before selecting the Apple Music you want to remove DRM from, click the Settings button to complete the output settings. You can customize the output format, output sound quality, output path, and other parameters for your songs.
The following parameters are available:
Output Format: Auto, MP3, AAC, WAV, FLAC, AIFF, ALAC
Output Quality: 320kbps, 256kbps, 192kbps, 128kbps
Output File Name: Track Number, Title, Artist, Album, Playlist Index, Disc Number, Space
Output Organized: None, Artist, Album, Artist/Album, Album/Artist
Step 3. Select Apple Music Songs to Convert
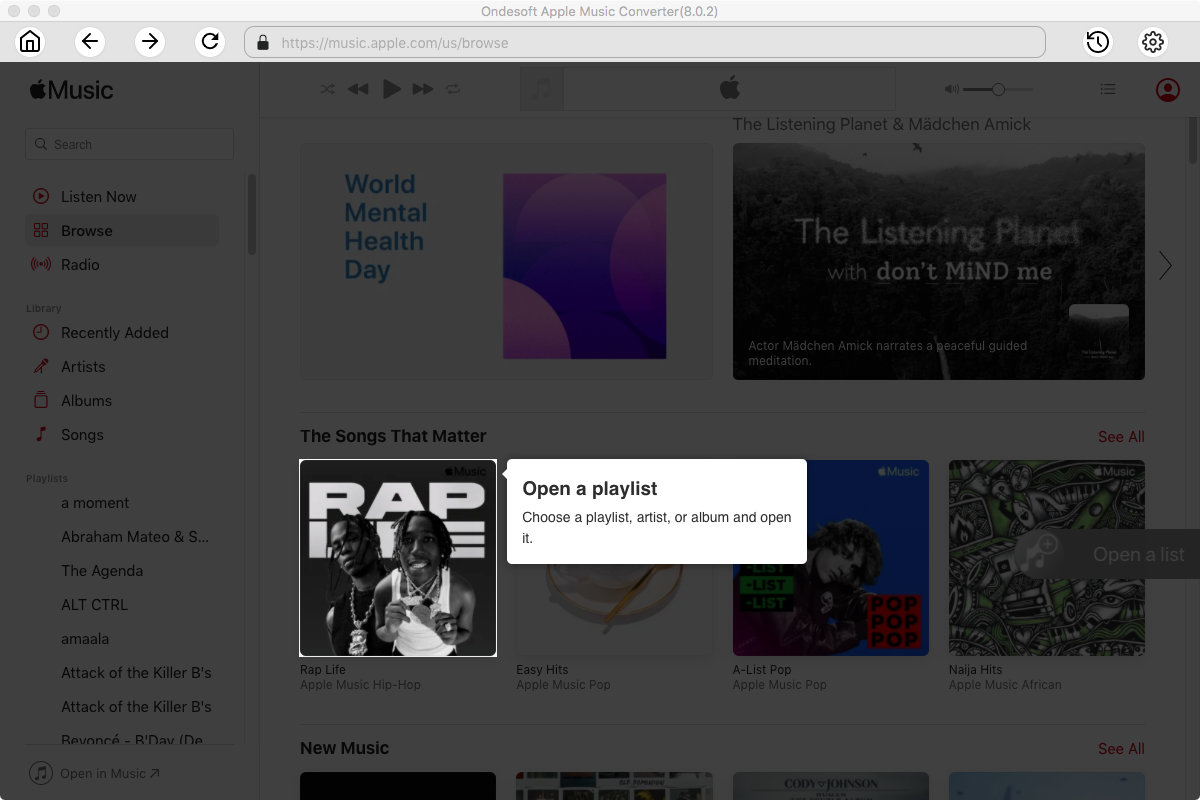
Follow the on-screen instructions to choose the playlist or album you want to convert.
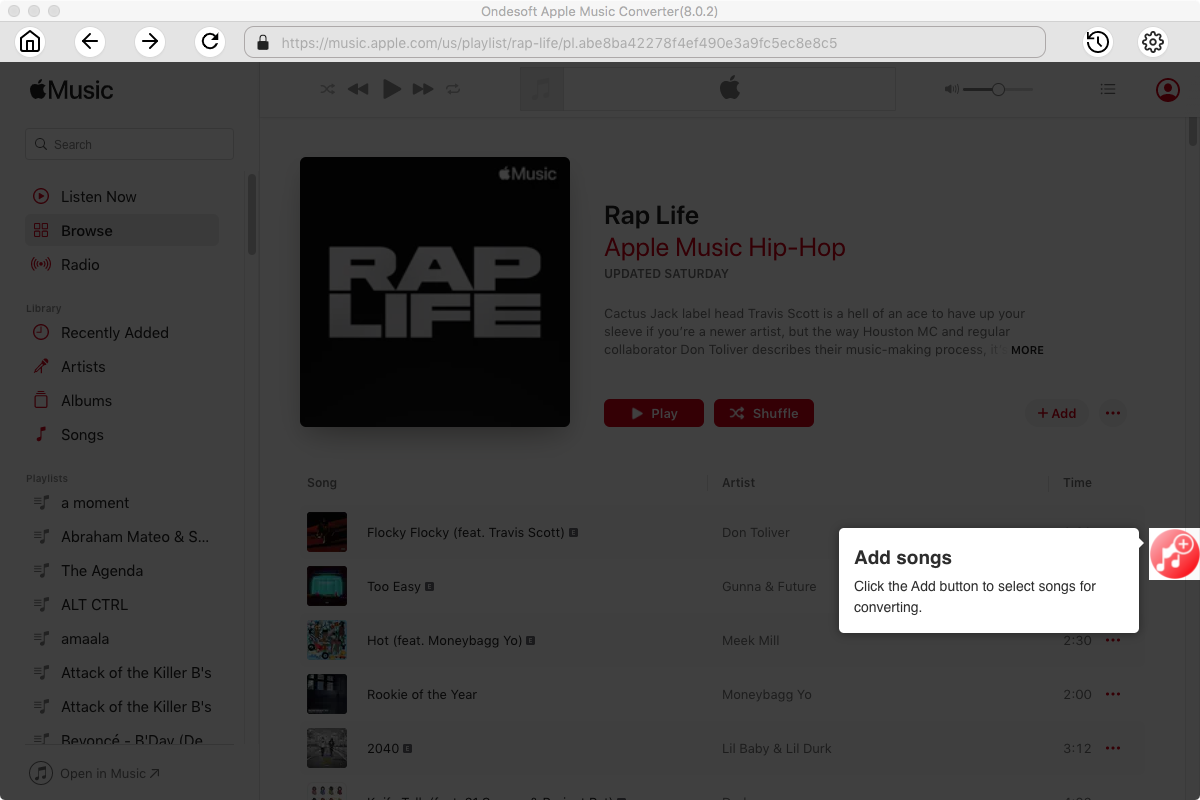
Click Add songs to add them to the conversion list.
Step 4. Start Conversion
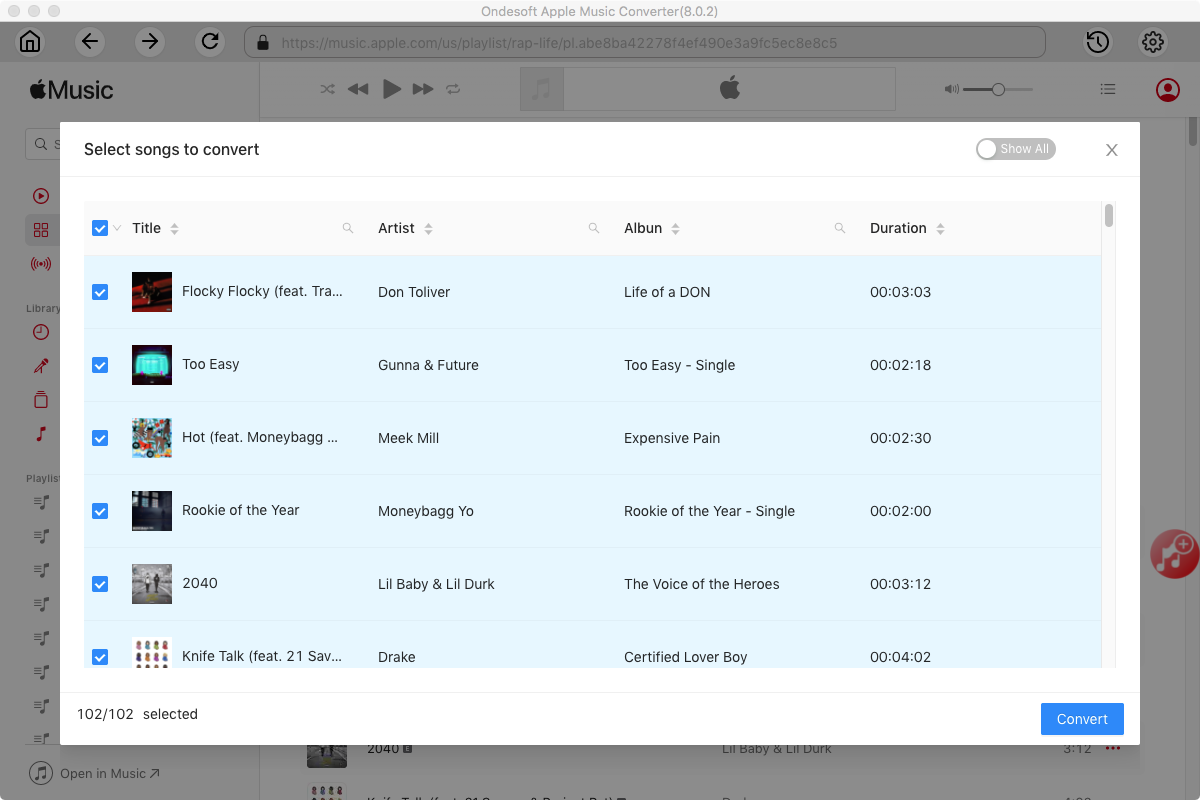
By default, all songs in the playlist/album will be checked. If there are songs you don't want to convert, please uncheck the box. Then click Convert button to start downloading songs to the format you choose.
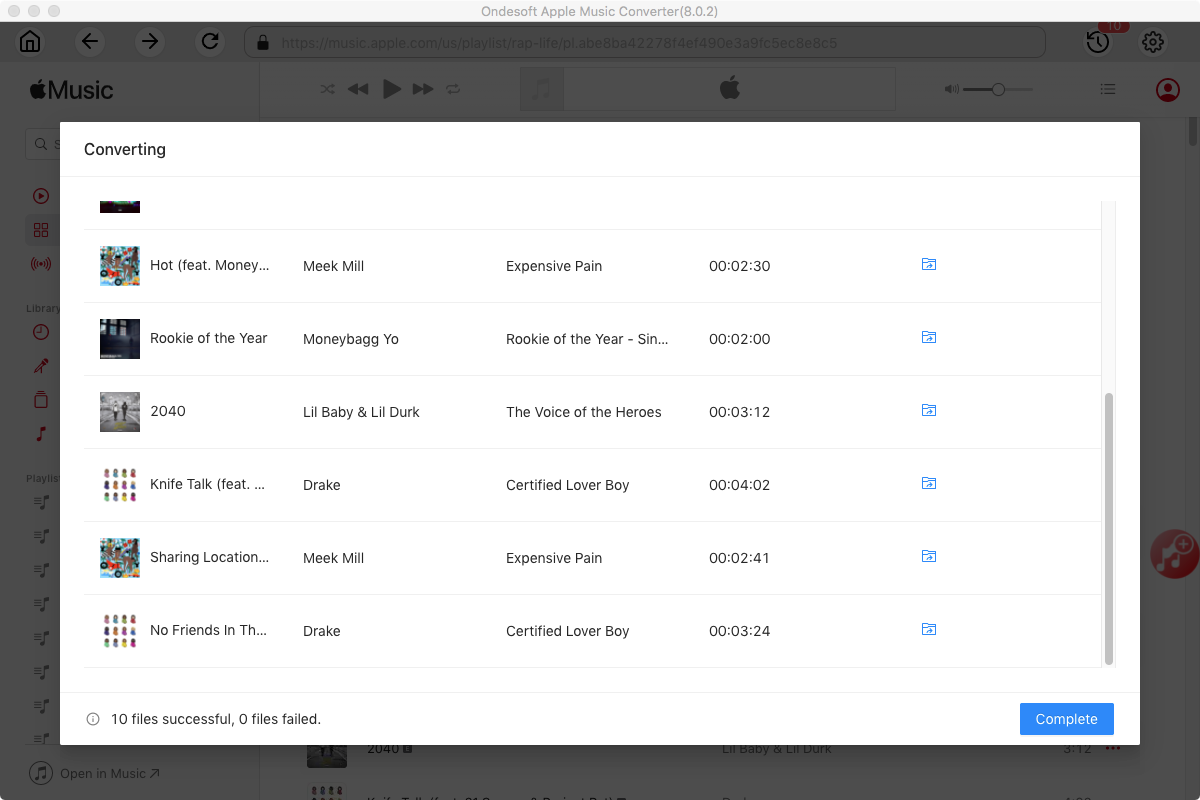
After conversion, click below folder icon to quickly locate the downloaded songs.
Sidebar
Apple Music Converter
Hot Tips
Apple Music Tips
More >>- Burn Apple Music to CD
- Add Apple Music songs to Inshot video
- Import Apple Music songs to GarageBand
- Workout Motivation Music MP3 Free Download
- Set Apple Music as ringtone on Android
- Set Apple Music as ringtone on iPhone
- Apple Music supported devices
- Play Apple Music on Google Pixel
- Play Apple Music on Moto G7
- Play Apple Music on Samsung Galaxy
- Play Apple Music on Fitbit Ionic
- Use Apple Music on Serato DJ
- Play Apple Music without iTunes
- Change Apple Music plan
- Download Apple Music Antidote playlist to mp3
- Fix Apple Music do not download on iPhone
- What is Apple Music DRM and how to remove DRM
- Apple Music on Android TV
- Play Apple Music songs on iPhone 4
- Apple Launches Web Version for its Apple Music Service
- Convert Apple Music M4P to MP3
- Convert Apple Music to MP3
- Download Apple Music on SD card
- Download Drake More Life to MP3 from Apple Music
- Solved: 3 Ways to Get Free Apple Music
- Cancel Apple Music subscription
- Listen to Apple Music without iTunes
- Listen to Apple Music without paying
- Play Apple Music on Amazon Echo without subscription
- Play Apple Music on Amazon Echo
- Stream Apple Music on Amazon Fire 7 Tablet
- Play Apple Music on Fire TV without subscription
- Play Apple Music on Android TV
- Play Apple Music on Fire TV
- Play Apple Music on MP3 Players
- Solved: Play Apple Music on Sonos without subscription
- Play Apple Music on SoundTouch
- Play Apple Music songs on Android without Apple Music app
- Remove Apple Music DRM on Mac
- Stream Apple Music on Amazon Fire TV Stick 4K
- Play Apple Music on Google Home
- Transfer Apple Music playlists to Spotify
- Upload and stream Apple Music songs on Google Play Music
- Play Apple Music on Android
- Apple Music on Amazon devices
- Stream Apple Music to Roku for free
- Apple Music on Samsung Smart TV
- Play Apple Music on TV
- Play Apple Music on Xbox One
- Set Apple Music songs as ringtone
- Enjoy Apple Music in the car
- Play Apple Music songs on Android Tablet
- Play Apple Music songs on iPod nano
- Play Apple Music songs on iPod shuffle
- Play Apple Music songs on iPod classic
- Play Apple Music songs on SAMSUNG Galaxy Tab
- Stream Apple Music on PS4 without downloading them
- Transfer Apple Music songs to USB Flash Drive
- Apple Music on PlayStation®
- Play apple Music on Chromebook
- 3 ways to listen to Apple Music on PC
- Convert Apple Music to MP3 on Windows
- Play Apple Music on Microsoft Lumia
- Play Apple Music on SanDisk Clip Jam
- Play Apple Music on Windows phone
- Apple Music Converter for Windows
- Apple Music now groups different versions of the same albums
- Download album Black Habits to mp3 from Apple Music
- Download Apple Music Replay 2020 playlist to mp3
- Download Apple Music Playlist Agenda to mp3
- Download Naomi Campbell's Apple Music Playlist to mp3
- Play Apple Music on Garmin Smartwatch
- Download Album YHLQMDLG to mp3 from Apple Music
- Convert Genius' video series Verified to MP4 from Apple Music
- Convert Lady Gaga Stupid Love music video to mp4
- Extract Audio from iTunes Movies, TV Shows or Music Videos
- Convert Justin Bieber Music Video Habitual to MP4 from Apple Music
- Ask Alexa to play Apple Music on Amazon Echo
- Download Halle Berry Apple Music Playlist to mp3
- Download Lady Gaga Apple Music Playlist to mp3
- Convert Justin Bieber's Music Video for Song ‘Available’ to MP4 from Apple Music
- Keep Apple Music songs after cancelling membership
- Use Apple Music in djay
- Add Apple Music to VirtualDJ
- Use Apple Music in Camtasia
- Play Apple Music on TomTom Spark 3
- Convert Apple Music to FLAC
- Convert M4P to M4A
- How to burn Apple Music songs to CD
- Play Apple Music on Kodi
- Set Apple Music songs as Alarm
- Apple Music Converter For Diehard Music Lovers
- Set a Sleep Timer in Apple Music
- How to turn off iCloud Music Library
- Create a Collaborative Playlist on Apple Music
- Why is Garth Brooks not on Apple Music or Spotify?
- 4 Ways to play Apple Music on Tesla
- How to use Apple Music Sing
- Apple Music Equalizer
- Free MP3 Download Sites
- How to check Apple Music stats


